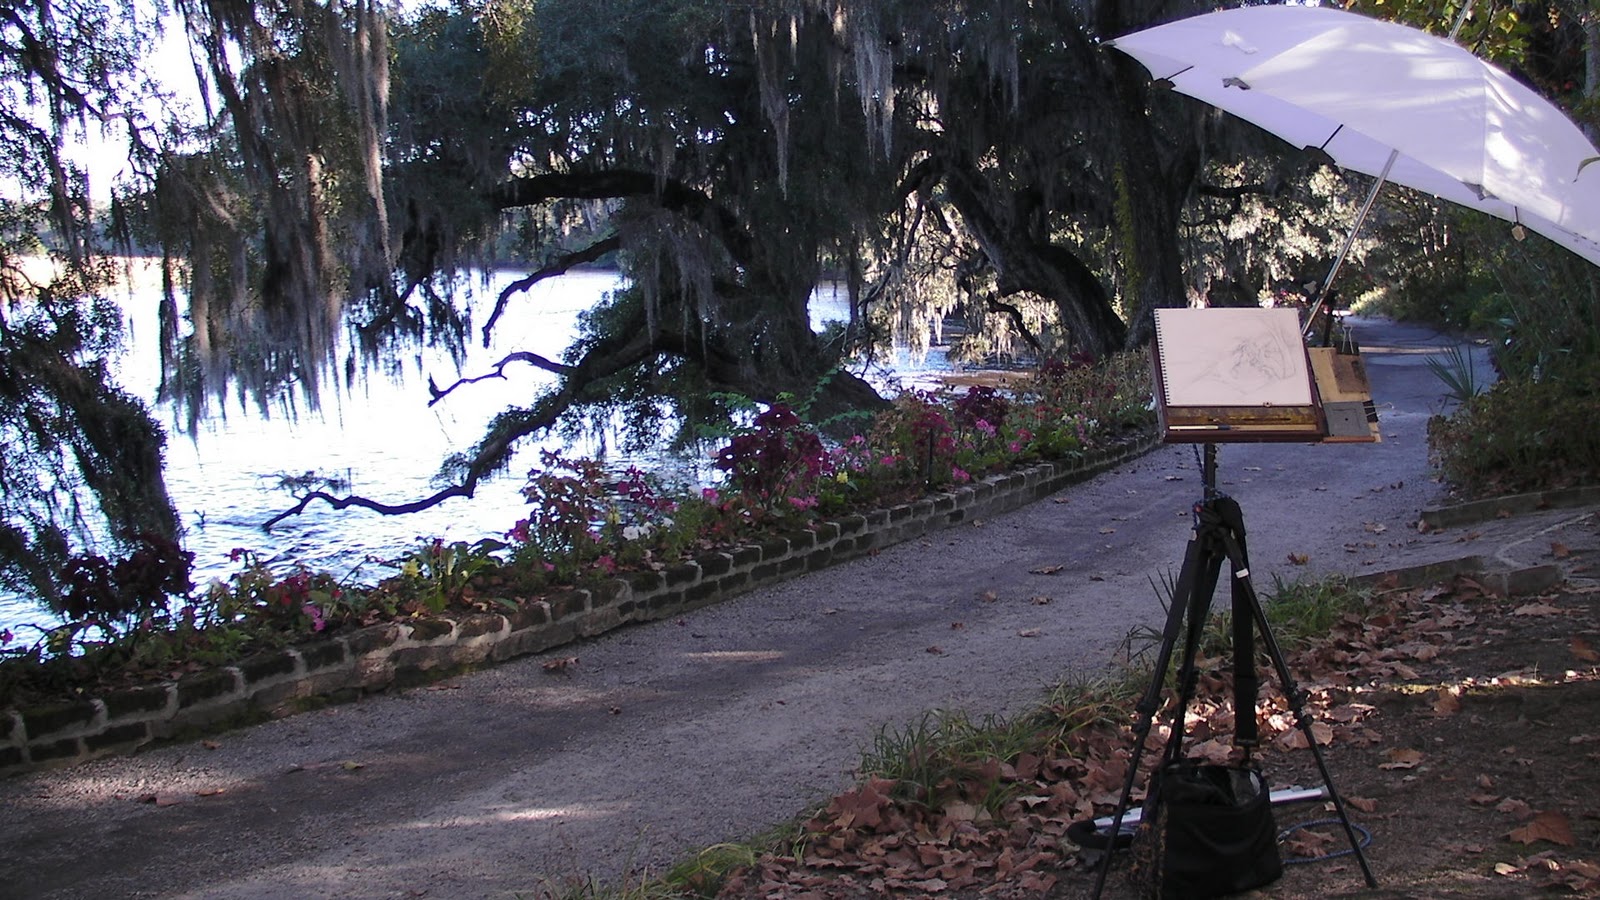
Wednesday, December 22, 2010

FAQ: Winged Victory Cast and Studio Wall Color


I often gets questions as to how I got my Winged Victory cast and where to get a good-quality version.

I bought mine after spotting it at a sidewalk sale in 2003. The owner had inherited it from his grandmother, and had had it in storage for many years. He wanted to sell it to someone who knew and loved the sculpture, and I was only to happy to tell him my story of falling in love with the statue when I first saw and drew her at the Louvre in Paris when I was 16. We struck a deal, and the statue was mine, to this day it is my prized possession. The original owner has visited the studio and was happy to see his grandmother's statue in a place of honor.

It's not easy to find good quality replicas, which are casts from the original. If you Google "Winged Victory" you will find a lot of cheap statues, but if you look closely the quality is very low and crude. The form of the figure and the folds of drapery look grotesque and amateurish. They are usually inferior copies by modern sculptors, not true casts from the original.

My understanding is that most museums no longer allow cast molds to be made from their works, so the only molds that exist are historic.

The only place online I know to order high-quality casts made directly from original historic molds is the Giust Gallery: www.giustgallery.com

They have several sizes of the Winged Victory here


Studio Wall Color
Sadie Valeri Atelier
I am also often asked about the color of my studio walls. We often think of modern art studios as having white walls, which is great for throwing light around the room and getting lots of light onto the easel. However, white walls make it very difficult to control shadows, and when working from life you want a good balance of light and shadow.

I noticed Grand Central Academy and a lot of the contemporary ateliers have dark grey walls. Also, when I Google-image-searched "atelier" I found some beautiful images of restored historic studios with dark walls.

The color I chose for my own studio walls is Benjamin Moore "Sparrow AF-720." Human fleshtones look lovely and glowing next to it, shadows look deep and rich, and it's easy to control the light bouncing around the room.

I used to think it had a touch of green in it, but after mixing the color for my paintings many times now, I find it can be matched accurately from mixing just from Cobalt Blue, Raw Umber, and a little white. Perhaps a tiny bit of the yellow cast of Raw Umber is reacting with the blue to make a tiny touch of green, but essentially it is just a neutral.

Click the slideshow below to see more photos of the studio:

Wednesday, December 15, 2010

Studio News: More Weekly Figure Sessions and Demos

I am excited to share with you that beginning in February I will be offering additional Figure Model Sessions and also weekly Lecture/Demonstrations at my San Francisco studio:

------------------------------------------------
Weekly Figure Model Sessions
------------------------------------------------


Tuesday Evenings Starting February 1, 2011
6:30 - 9:30 pm, ongoing
$70 for 4-session pose, 12 hours

Thursday Evenings Starting February 10, 2011
6:30 - 9:30 pm, ongoing
$70 for 4-session pose, 12 hours

Monday Afternoons Starting February 7, 2011
11:30am - 4:30pm, ongoing
$110 for 4-session pose, 20 hours

For more details and to register, please click here to visit my Teaching Page

------------------------------------------------
Live Lecture/Demonstrations
------------------------------------------------

During the lecture demos I will be sharing my philosophy and techniques for figure drawing and painting:

Mondays, 10am-11am, ongoing
Starting February 7, 2011

Thursdays, 5pm-6pm, ongoing
Starting February 10, 2011

$20 per 1-hour lecture

The Lecture/Demo is offered one hour before the Monday and Thursday Figure Model Sessions.

Reserve your space by payment in advance with check or credit card.

For more details and to register, please click here to visit my Teaching Page

Friday, December 10, 2010

Motivation and Discipline Don't Help


My art studio, 2004

This was one half of my small kitchen in the 1-bedroom apartment I lived in. I did not have stable north light, so I hung a sheer white curtain to filter the direct sunlight.


In 2004 I took a class that taught me the basic historic technique for creating a layered oil painting. To practice I set up this little studio in my kitchen and a did a painting using the method I was learning in the class. 


Study for Vase and Creamer

9 x 9 inches, pencil on paper
2004


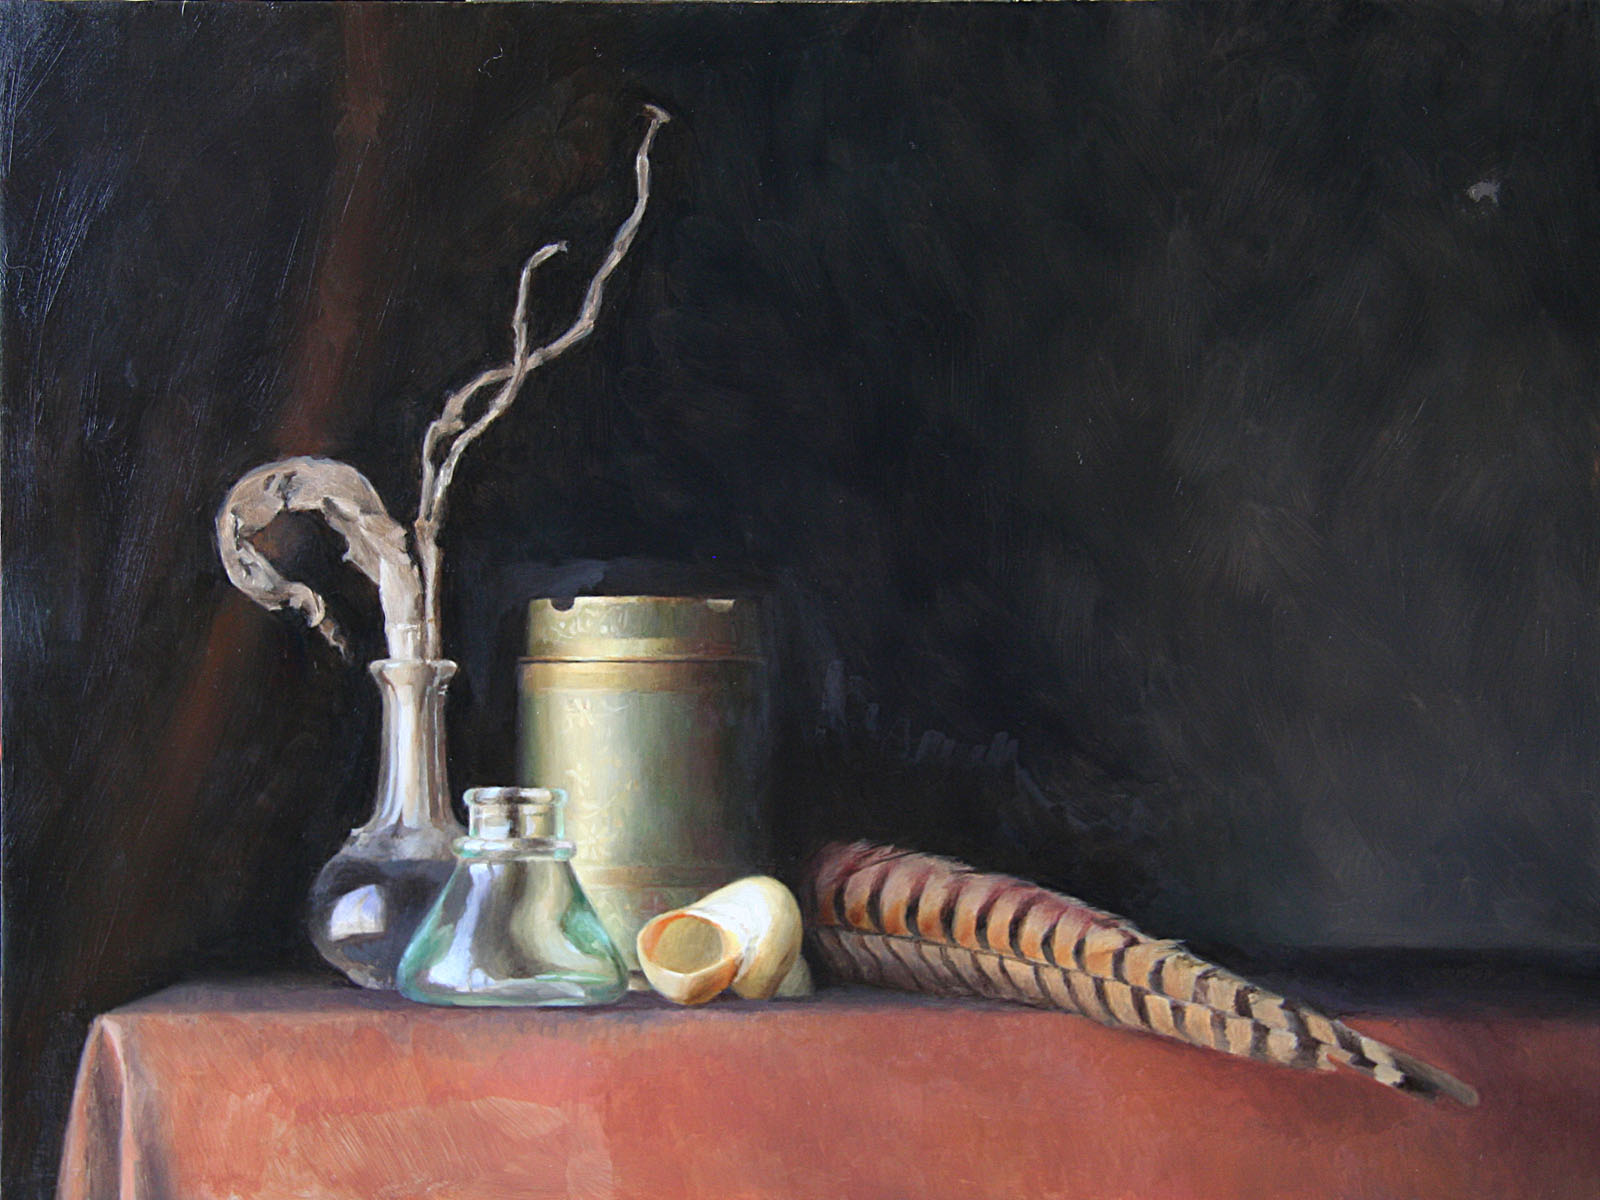
The still life was the first drawing and the first oil painting I had done on my own in about 10 years. I was exhilarated and thrilled, and mostly just so relieved when I made this little painting.

Vase and Creamer

9 x 9 inches, oil on panel
2004


It had taken me years of "thawing out" a severe, crippling artists' block to get to the point where I could even attempt to make a painting.

...

For many years after I graduated from art school at RISD I was very discouraged as an artist. I did not ever make any art on my own, outside the occasional life-drawing class. I felt like I was an artist. But a real artist paints, and I was not painting. I felt like I "should" be painting. 

I think I was stymied by my idea of what art and painting should be, by my idea of what was "Important Art."

Important Art was what was showing in the New York gallery scene of the 1990's, or in the New York MOMA. Important Art was what my art school friends who went on to do Masters of Fine Arts degrees were doing: very large, abstract or semi-abstract paintings.

I had never had an inclination to paint abstractly, and the semi-abstract figure-ish work I was introduced to in art school looked to me like what an insane person might paint.

All that was interesting to me intellectually, and I liked to look at it and talk about it with my friends, and I admired many of them for their skill with painting abstractly, but I never felt a shred of desire to paint that way.

But the only other option for a painter, other than Abstract or Figurative (semi-abstract figure-ish), was to be a Bad Artist. A bad artist was a "sellout" who sold pictures of flowers or children or seascapes at tourist galleries. I was very afraid that if I made that kind of art I would be a Bad Artist.

I left art school believing that Important Art came entirely or mostly from your head, and that art done while looking at something in real life was just a "study". Landscape, Figure, Portrait, and Still Life were all ok to do as studies, but if you were to do that for your real Work, you would fall into the category of Bad Artist.

I had been accepted into the most prestigious art school in the country based on my high school portfolio of highly realistic drawings and paintings done from life. And then I was taught that that was not art.

So, feeling like I was never going to be a Real Artist much less an Important Artist, I just stopped making art. I described myself to acquaintances as a designer, never as an artist.

For years I let people people assume I'd majored in design at the Rhode Island School of Design, and did not reveal that I'd spent all of my 4 years there doing figure drawing and oil painting.

But over the years after art school I got very depressed. I put in hours at my graphic design job, and mostly just killed time between my working and sleeping hours.

But I always knew what my problem was, I always knew that I would feel better if I could start painting. So I tried very hard for a lot of years to start painting. In fact, in my head, I was trying very hard to get back to painting pretty much all of the time.These were the things I tried:
  • Trying to be "disciplined"
  • Trying to be "motivated"
  • Making plans to do x just 10 minutes a day
  • Being angry and disappointed at myself
  • Putting enormous pressure on myself
I did a LOT of that, all the time, for many years, and none of it was successful for helping me get back to making art. It just made me feel worse.

I began to realize that my idea that I might be a Bad Artist was stopping me from doing ANYTHING creative. So I decided to do the smallest, tiniest project that felt creative but that was NOT ART. As soon as I called it art, I could not make myself do it. 

So the smallest, easiest thing I could find to do, that was a tiny bit creative, was going to a fabric store and buying buttons. I spent a long time picking out the buttons. I did not make anything with them, I just bought them.

It sounds so silly, and it's completely embarrassing to me that that was my creative project. It was embarrassing to me even then, when I did it. But I had gotten to such a low point of despair, that doing something so small and insignificant as buying buttons felt better than the way I felt most the time.

After I bought the buttons, and did some more equally small "creative projects", and after a while I felt inspired to play with collage. I had experimented with collage in art school, and so I started collecting materials again and making collages again. I did this on my living room floor, with the TV on. I made about 20 of these:


"The Stage", 2003
9 x 12, mixed media on paper


Then, in 2003 I saw the movie "The Girl with the Pearl Earring", which is about Vermeer. The movie imagines that the subject of his famous painting is his young maid, whom he trains to mix his paints. The movie is beautifully shot, with gorgeous sequences showing Scarlet Johansson sifting pigments and mixing oils by soft Dutch light filtered through small windowpanes. 

I started wondering if anyone taught how to do Old Masters' painting techniques any more, and if I could learn any of that. A few months later I found Kirstine Reiner's ad for art classes on Craigslist, offering lessons on mixing paint pigments and Old Master oil techniques. In early 2004 I signed up for 10 lessons.... and for the first time in many years, I picked up a paintbrush.

...

So many of my students struggle with how to set up a consistent practice outside of class hours. I can see the pressure they are putting on themselves, and their frustration. 

I tell them to remember learning to drive a car as a teenager: There is no way you could learn to drive if you only practiced an hour or two a week in Driver's Ed for a couple months. You had to put in dozens, maybe hundreds of hours behind the wheel for a few years before driving a car started to feel completely comfortable and natural. Learning to paint is exactly like that. As the instructor, I can give you some help and ideas and guidelines, but to get a feel for painting, you just have to do it on your own for a few hundred hours.

But I know it's hard to find a way to put in those hours. 

If you want to paint and you are not painting, then whatever you are currently doing to try to paint is not working, so try something completely different.

Instead, just do the smallest thing you can call "creative." Go for a walk and take some snapshots. But if you plan to do that and you find the weekend goes by and you didn't get around to it, do something smaller: just go browse in a flower shop or bicycle shop. And if that does not happen, just notice a crack in the pavement with some moss growing in it. Just stop and look at something that interests you for 5 seconds. 

That's it, you are being creative.

We are all creative all the time, we just don't realize it. If you want to paint, you probably already notice things around you all the time you wish you could paint or draw. Our ideas about what is Art, or what is Real Art, or what is Good Art versus Bad Art , don't help us to actually be artists. Don't focus on being a good artist. Don't try to be motivated or disciplined, don't even try to be an Artist. 

Just focus your attention on what interests you in your normal, day-to-day life, starting with just a few seconds or minutes at a time. The rest takes care of itself.

Wednesday, December 01, 2010

Friends of a Feather


Friends of a Feather
12 x 16 inches, oil on panel
I am pleased to announce that my recently completed painting "Friends of a Feather" will be showing at the Susan Powell Fine Arts holiday show:

679 Boston Post Road
Madison, Connecticut 06443 USA
Tel: 203 - 318 - 0616

Below are the in-process shots of the stages of the drawing, the under painting, and the final painting. 


Wednesday, November 17, 2010

Plein Air Setup


Painting outdoors is inspiring, beautiful, centering, and so adrenaline-rushing as to be addictive!

However, it is also uncomfortable, frustrating, full of distractions, and when your umbrella topples your easel over in a breeze, exceptionally maddening.

I have finally assembled a setup I find to be ideal - a good balance of lightweight, sturdy, and flexible:


This is how I pack it:
Instead of carrying around tubes of oil paint, I load up my Open M pallete with fresh nuggets of paint before I leave for the day. Sometimes I pack a small tube of white, if it's going to be a long day out.

I can fit my Open M pochade box, brushes, and solvent can in a backpack or shoulder bag, along with paper towels, lunch, etc.

The tripod, cane, Manfrotto arm, and umbrella I lash together with 2 short bungee cords. All those things combined are not very heavy, and I can carry it by the cane handle, or under my arm easily. For a long hike I might get a strap for it so I can carry it on my back.

Travelling with oil paints
I have traveled now many times with oil paint, and despite the horror stories we have all heard about having oil paints confiscated, I have never had a problem with this procedure:

Here is what I do:

  • Download and print a couple "material safety data sheets" (MSDS) which describe the contents of the paint - there's a different sheet for every color, but I just choose 2 or 3 and print those. Each manfacturer writes up and makes data sheets available online as PDF for all their colors, just google search one your paint brands and a color name with the phrase "material safety data sheets" and you'll find it.
    Here is a list of links to of many of the of MSDS paint brands
  • Print out a sign with big font that says:
    These are vegetable oil based artists materials.
    They are not flammable.
    Data sheets enclosed.
    DO NOT USE THE WORD "PAINT". The word paint is a big problem.
  • Fold the MSDS sheets and the sign together so the big message shows up on top.
  • Put all the tubes of oil paint in a gallon-sized heavy duty ziplock, and put in the folded packet of sheets so the sign is visible through the plastic bag. Make sure every tube is tightly-capped and there are not any holes in any of the tubes, the pressure changes during the flight will make a mess of any leaky tubes.
  • Place the bag near the top of your suitcase with the sign-side up so it's immediately accessible if security searches my bag. (I always get that little note saying they searched my bag, but my paint has never been confiscated.)
  • Check the bag. I wouldn't try to bring paints on board.
  • I also packed a tiny tin of the "natural turpenoid" (in the GREEN can) along with my painting supplies in my checked bag, to use as my medium. It says non-flammable very clearly right on the tin. I wouldn't use it as a medium in major paintings, but for sketches and all prima work while travelling it's probably fine.
  • I wouldn't bring any solvents, oils, mediums, or any kind of mysterious liquids in bottles. I usually buy those or borrow them when I arrive
  • Finally: Don't forget your palette knife! :)

Hope that helps! It would be terrible if the paints got confiscated and that's always a risk, so I can't guarantee it will be fine, but it's worked for me.

Saturday, November 13, 2010

WPW on Expedition: Final Recap

Sitting at the airport gate, I realize that out of our group of 12 artists, I am the last to leave Charleston, SC, if only by a mere 30 minutes. Starting on Thursday, members of our little group started to reluctantly peel away, each of us returning to our studios, family, and the demands of daily life. Enormous duffels of painting equipment were trundled down the porch steps and loaded into cars, the furniture was returned to its original positions, and as the last of us closed the door on the beach-front house, there was no sign of the easels, tripods, drop cloths and rows of drying paintings that had made their temporary invasion.

The impact of the week on each of the 12 artists, however, will be more permanent.

In the beginning, we were all a bit apprehensive. A dozen women in a house for a week? But after the first couple days, a sense of relief seemed to fall over the group as we realized it was actually working: We were painting for most the hours of every day, talking art every minute we were not painting, and quickly becoming attached to one another.

Many of us were sleeping 2 to a bed, the rest on inflatable mattresses and couches, all 12 of us negotiating just 3 1/2 bathrooms. But despite the tight quarters, the trip was nothing if not organized, mainly through the efforts of Alia, and with help from Diane, who between the two of them had anticipated every conceivable need over the months leading up to the trip. Cooking and cleaning duties had been assigned in advance, massive grocery runs were organized the first days, an improvised but elegant method for reimbursing shared expenses was soon devised by tacking envelopes to the bulletin board. Locations for plein air painting had been scouted, models had been scheduled. Everything was set up for us to work!

Before the trip, most of us only knew 1 or 2 of the others. The idea had started among the three of us who founded the WPW blog, Alia, Diane and myself, and the two artist bloggers Cindy and Lisa of ArtStudioSecrets.com. The five of us then each nominated other artists we knew and admired, and the group quickly took shape. However at the last minute we were all disappointed when life events conspired to prevent Lisa’s attendance. (In the end, we were an even dozen, and next year we are determined that Lisa will make us a baker’s dozen!)

Despite the daunting prospects of travelling with plein air gear, navigating a high-profile opening at Robert Lange, and then embarking on a “Real World” -style living situation, we set a single goal: To make painting the number one priority of the week, putting aside all distractions. And as soon as we started working with a model at 9am our first morning at the house, the collective energy began to carry us all.

Mia was the first one out painting on the beach, and banged out an oil sketch that set the bar high for the rest of us. For the rest of the week, day trips to surrounding marshes, parks, historic cemeteries, botanical gardens, Charleston’s French Quarter, and the lovely home of artist Shannon Runquist, kept us more than busy during the day. We then hired models in most the evenings, so we were often painting until 10pm. Several of us tried our hand at cooking for 12, and we did a good job of feasting in addition to painting.

But the most amazing part of all was how our conversations penetrated to deeper issues during the week. Discussions that began with the best way to prepare a plein air canvas, or about what colors to use in a sky, began to evolve into interviewing each other about how we each address our personal struggles with studio life: Managing time, finances, commissions, galleries, and family; combating isolation and depression; sacrificing other goals and interests for the undivided pursuit of painting. Over and over were heard exclamations of “me too!” when these struggles were confessed. I know for myself, and I am sure for each of us, issues I thought were only my problem turned out to be shared by every artist in the house.

As artists, we work alone most the day, and our solitude is necessary and closely guarded. But peaceful, fortifying solitude can easily slip into lonely isolation. As women, there are both evolutionary and spiritual reasons it is necessary to our survival to connect with other women, to find common ground and form deep bonds of understanding, to navigate conflicts and find abundance where we thought there was only scarcity. To cheer for our competition and feel true joy in their successes.

I do know that this week for me was so deeply satisfying, so soul-nourishing, that I am sure in my bones that this kind of connection with sister artists is essential.

To Alia, Diane, Cindy, Mia, Alex, Cathy, Linda, Kate, Stephanie, Terry, and Rachel (and to Lisa who could not come but whom we thought of often):

Thank you!!!

Thank you all, for catching the spirit of the trip and bringing your energy and enthusiasm, for being flexible with your needs and generous with your help and advice, and most of all for being so willing to trust us and to reveal yourselves.

UPDATE:
Several of the WPW Expedition group have now blogged about the trip, you can read their posts here

Thursday, November 11, 2010

WPW on Expedition: Wed and Thurs


Philadelphia Alley, Queen Street entrance, Charleston, SC
9 x 12 inches, oil on panel


Wednesday I painted in downtown Charleston. This city is so beautiful that I saw a half-dozen scenes I'd like to paint within just a couple blocks! I finally set up in a cobble stoned alley


Color study of Lauren

10 x 14, oil on panel

After painting outside for the afternoon, we hired a model for the evening and set up in the living room. I am completely unfamiliar with single-session figure painting, so I was scrambling for the 3 hours, but I was happy to at least have managed a reasonably proportioned figure with basic color blocked in.

Today (Thursday) I returned to Magnolia Gardens and decided to do pencil sketches of an amazing tableau of 3 live oaks which I'd spotted on our previous trip to the gardens.


Tuesday, November 09, 2010

WPW on Expedition: Tuesday


Tree study at the Isle of Hope, SC

Today Shannon Runquist invited us to paint at her home, which backs up to to marshland where I set up. We also hired a model, and some painters worked with her on Shannon's veranda.

 Raw umber underpainting, leaving edges soft


Blocked in the sky to help define edges

Blocked in marsh grasses

Smaller brushes to define details and edges of leaves.

I'm hoping to get another session on this painting when we return Thursday.


This was my lovely painting location, on a dock over the marsh

I am loving my plein air setup with the umbrella and a new double-jointed elbow clamp to attach it to the tripod. I am also really happy with my Open Box M easel. I'll be writing a full description of my setup soon!


A friend kept me company at the end of the dock.

Monday, November 08, 2010

WPW on Expedition: Monday


Pond Study, Magnolia Plantation and Gardens
5 x 7, oil on panel

Today we visited a beautiful botanical garden, it has 500 square acres but we were all ready to set up our easels after walking just a few feet into the grounds. There were so many amazing scenes to paint I wish I could spend a month there!

The photo of the painting was taken with my phone, better quality coming soon!

Sunday, November 07, 2010

WPW on Expedition: Charleston, SC

Sullivan's Island Marsh Study, 5 x 7, oil on panel

Shoreline Study from Sullivan's Island, 5 x 7, oil on panel


3 hour Study of Lucy

Brown pencil on paper, 9x12

A quick recap of the art taking place!

In addition to the exciting show opening events, we have actually been getting real work done! The first day we worked from a live model. I was not ready to paint yet and did the above line drawing of the 3-hour pose.

The next morning some people painted in downtown Charleston, but Catherine Prescott and I stayed behind to work at the marsh:


Every morning we wake to an amazing sunrise
 over the incoming tide just outside our windows.

Mia Bergeron painting at low tide just outside our house.


Our house.

Alia El-Bermani painting on the deck of the house

Catherine Prescott painting with me at the marsh Saturday.

I was on cooking duty Saturday evening and made 6 roasted garlic, lemon and basil chickens.

Me posing with my oil sketch of a tree

Diane Fiessel braving the chilly breezes on a small bridge.

Study of fallen Live Oak, in water
5 x 7, oil on panel

Sunday afternoon we went to Magnolia Cemetery, a beautiful 19th century park-like setting with spanish moss-draped oaks and ornate statuary overlooking ponds and marshes.

Photo of statuary at Magnolia Cemetery

Photo of statuary at Magnolia Cemetery


Oil sketch, Magnolia Cemetery, 9 x 12, oil on panel

Mountains of steamed oysters!!

Tonight we were treated to a dose of true Southern hospitality by artist Shannon Runquist and her husband Lars when they invited us to her home for an amazing oyster roast. She stuffed us with oysters, grits-and-shrimp, and banana merengue pie, what a fabulous evening!